Android Touchscreen Calibration Guide
Is your phone's screen acting up? Learn how to fix it with our practical guide to android touchscreen calibration, using diagnostics, apps, and pro tips.
 Editorial
Sometimes, what feels like a major screen failure is just a simple software glitch or even physical interference. Before you dive into complex fixes, it’s worth taking a moment to figure out what’s really going on. A few minutes of diagnosis can save you a ton of frustration and a potentially expensive trip to the repair shop.
The goal here is to separate the temporary hiccups from genuine hardware damage.
More often than not, the problem isn't the screen itself but something sitting on top of it. A poorly installed screen protector, especially one with trapped dust or air bubbles, is a classic cause of phantom inputs or dead zones. A clean application is critical, as we cover in our guide on a dust-free installation for tempered glass. Likewise, a case that's too tight or has warped over time can press on the edges of the display, causing all sorts of erratic behavior.
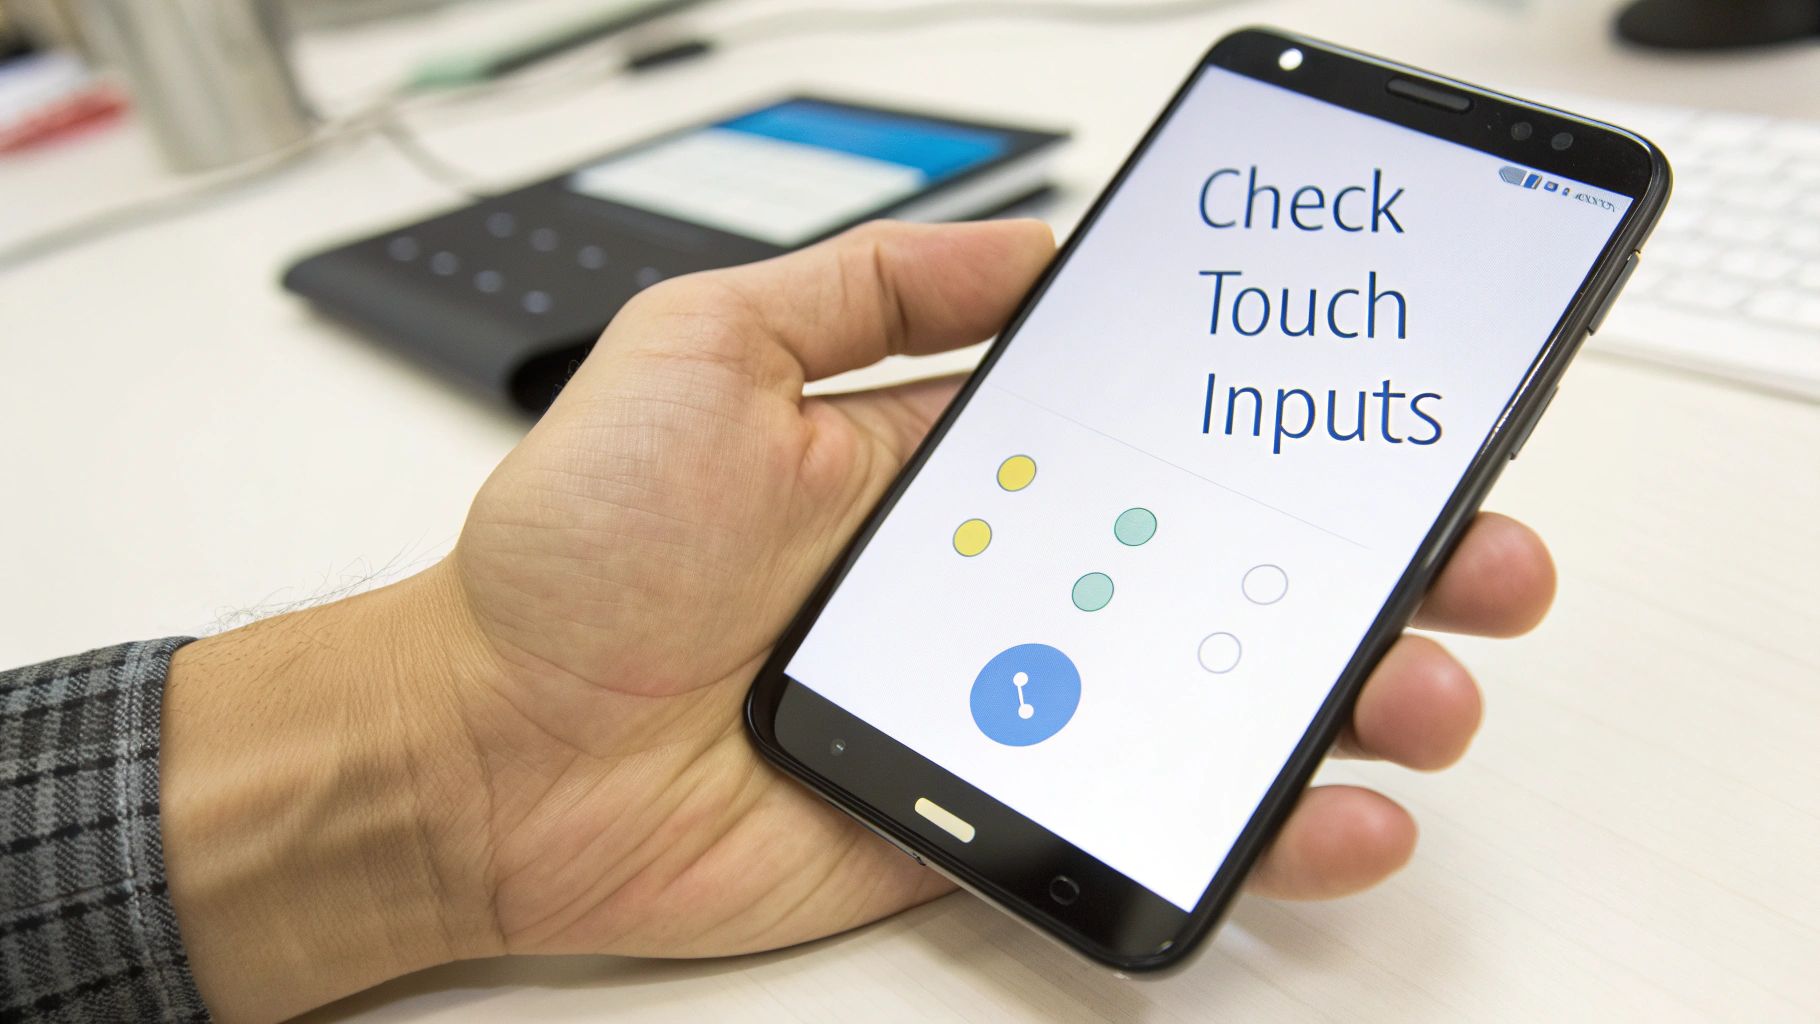
Using Developer Options to See Your Touches
One of the best ways to get to the bottom of a touch issue is to see exactly what your phone is registering. Android has a fantastic built-in tool for this, but it’s tucked away in the Developer Options.
First, you'll need to unlock these settings:
- Head over to Settings > About Phone.
- Find the Build Number and start tapping on it—seven times in a row should do it.
- You'll see a little message confirming you're now a developer.
With that done, go back to your main Settings menu, find System > Developer options, and look for two settings: Show taps and Pointer location. When you enable Pointer location, your screen will display lines that track every single touch, swipe, and gesture you make.
This is your visual proof. If you see taps appearing where you aren't touching (ghost touches) or a spot where the lines consistently disappear, you've just confirmed there's a real problem.
Software Glitch or Hardware Failure?
Armed with the visual feedback from Pointer location, you can start playing detective. Do the ghost touches pop up randomly all over the display? Or do they only happen when a specific app is running? If so, you're likely looking at a software issue. A buggy app or a system process could be sending false touch signals.
On the other hand, if the problem is always in the exact same spot—like a dead horizontal line or an unresponsive corner—that’s a strong indicator of a hardware failure. This usually means the digitizer, the invisible layer that senses your touch, is damaged in that area. Issues like these go beyond simple calibration and often require professional help. For example, similar symptoms on a tablet might need professional iPad repairs.
This visual flowchart helps break down the most common screen issues and what they typically point to.
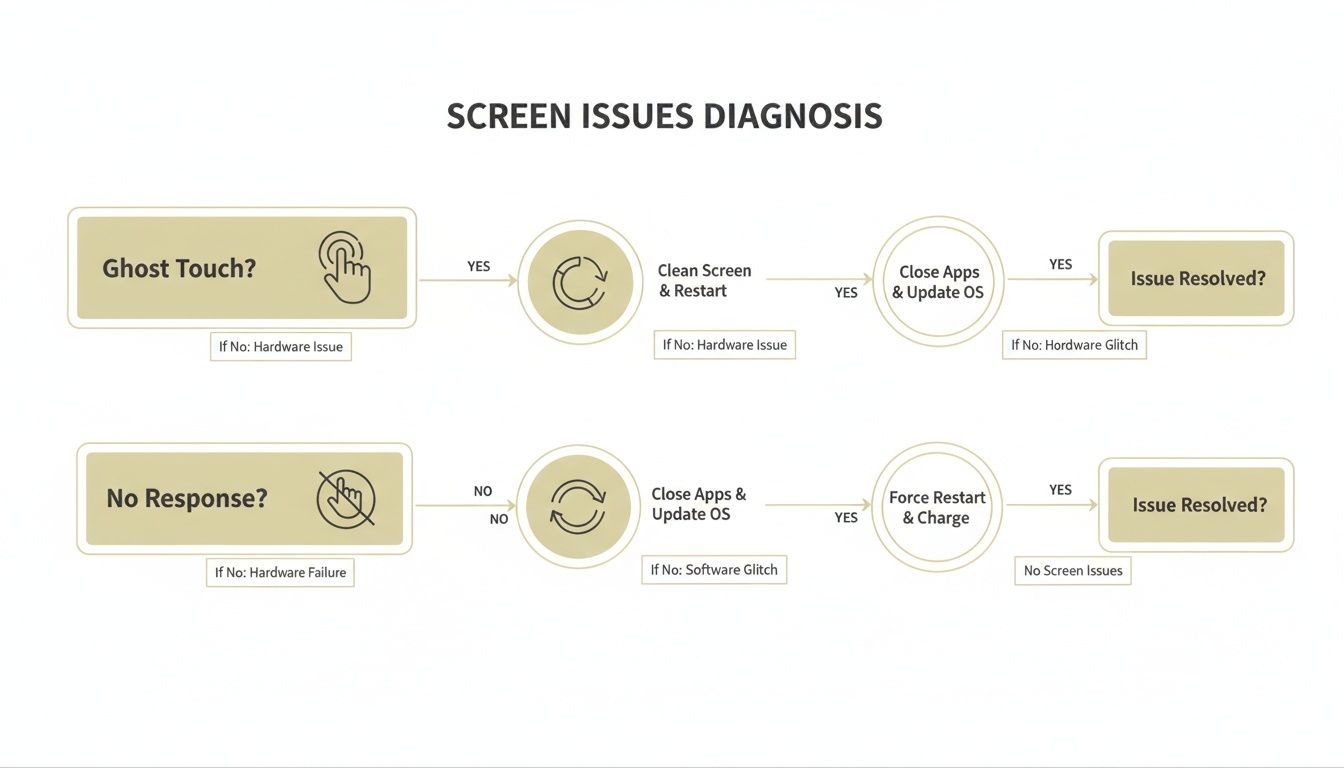
As you can see, problems like ghost touch and lag often have software-based fixes, whereas a completely dead spot is almost always a hardware fault.
Special Considerations for Foldable Phones
If you're using a Galaxy Z Fold or a Pixel Fold, there’s an extra layer to this diagnosis. That incredible hinge is a feat of engineering, but it's also a potential point of weakness.
Damage to the hinge, or even just debris getting stuck inside, can put uneven pressure on the flexible display. This can lead to touch problems that seem to appear right near the crease. If your screen works perfectly when laid flat but goes haywire when partially folded, that’s a dead giveaway of a hinge-related issue, not a calibration error.
Uncovering Android’s Hidden Touchscreen Tools
If you’ve been digging through your phone's settings looking for an "android touchscreen calibration" menu, you probably came up empty. That’s not a bug or an oversight—it’s a conscious design choice that shows just how far touchscreen tech has come. Modern Android devices are worlds away from their predecessors, with screens that are much smarter and more self-sufficient.
The real reason you can’t find a dedicated calibration tool is because today’s screens are built to handle it all automatically. Your phone's operating system is constantly running complex algorithms that monitor your touch inputs, learn your habits, and make tiny adjustments in real time. This dynamic system silently corrects for minor hardware quirks and even environmental shifts, like changes in temperature.
The Shift from Manual to Automatic Calibration
This self-correcting design is a huge leap forward. In the early days of Android, manual touchscreen calibration was a standard feature, especially on devices running versions before Android 5.0 Lollipop (released in November 2014).
By simply dialing the secret code *#*#2664#*#* into the phone app, owners of older phones—think models from 2010 to 2014—could access a hidden test menu. This tool let you make precise adjustments to touch sensitivity and alignment, fixing common headaches like ghost touches or dead zones that plagued early screens.
As the hardware got better, manufacturers realized that manual calibration was becoming unnecessary. Worse, it could sometimes create more problems than it solved if a user calibrated their screen incorrectly, making a perfectly good display feel broken.
The move away from user-facing calibration tools wasn't about removing a feature; it was about building a more reliable, hands-off system. Modern Android assumes the hardware is precise and focuses its energy on software-level optimization to ensure a smooth user experience.
This evolution is why troubleshooting today has shifted from "recalibrating" to "diagnosing." Instead of trying to tweak coordinates yourself, the goal is to figure out if your problem is a software glitch, a misbehaving app, or a genuine hardware fault.
Finding Modern Diagnostic Tools
While the old-school calibration menus are gone, many manufacturers still build in hidden diagnostic modes. These tools won't let you manually recalibrate anything, but they are incredibly useful for testing your screen’s health. They often provide a grid or drawing pad to help you pinpoint unresponsive areas or detect phantom touches.
Accessing these menus usually means dialing a specific code into your phone's dialer. These codes, often called MMI or USSD codes, are different for almost every brand.
-
Samsung: Try dialing
*#0*#. A menu should pop up; from there, select the "Touch" option. -
Xiaomi: A common code is
*#*#6484#*#*, which launches the Hardware Test menu where you can find touchscreen diagnostics. - Other Brands: Manufacturers like OnePlus or Motorola often have their own unique codes. A quick web search for "[Your Phone Model] secret codes" or "[Your Phone Model] service menu" will usually point you in the right direction.
Once you're in a test mode, you can systematically check every part of your display. The on-screen guides will typically ask you to draw lines or fill in boxes, giving you immediate visual feedback on the digitizer's health.
Sometimes, diagnosing a tricky screen issue requires more than just a static test. If your problem is intermittent, you might need to catch it in the act. Learning how to screen record your Android device with sound can be a huge help here. A recording that captures the glitch as it happens is invaluable if you end up needing to show the problem to a repair technician.
Checking Out Third-Party Calibration Apps
When the built-in settings don't quite cut it, you’ll find a sea of third-party apps on the Google Play Store promising to fix your touch woes. But it's important to know what you're getting into—their effectiveness can be a real mixed bag.
Most of these apps don't actually perform a deep, hardware-level recalibration. Instead, they guide you through a series of taps and swipes. This process simply gathers new data on how you use the screen and tells the Android system to reset its existing touch profile. Think of it less like a tune-up and more like clearing a corrupted cache for your touchscreen.
Finding an App That Might Actually Work
The sheer number of options can be overwhelming. The explosion of touchscreen calibration apps highlights a huge demand from users, with some apps racking up millions of downloads as complaints about touch issues rise. The 'Touchscreen Calibration' app by RedPi Apps, for example, has blown past 5 million downloads with a solid 4.1-star rating. That’s a serious number of users, especially in a market where Android has a massive 72% share. You can see the feedback for yourself over on the Google Play Store.
Here’s what I look for to separate the helpful from the hype:
- Downloads and Ratings: It’s not a perfect system, but millions of downloads and a rating over 4.0 stars usually means it’s worked for someone.
- Recent Updates: Tech moves fast. An app last updated two years ago is probably not optimized for your phone. Stick to apps updated in the last six months.
- Clear Instructions: Good apps walk you through the process without confusing jargon.
- Minimal Permissions: A calibration app has no business asking for access to your contacts or photos. If it asks for weird permissions, uninstall it.
Before you start, here's a quick look at some of the most popular options available.
Top Android Touchscreen Calibration Apps Compared
| App Name | Key Features | User Rating | Best For |
|---|---|---|---|
| Touchscreen Calibration | Simple step-by-step process, response time testing, clear pass/fail results. | 4.1 Stars | Users looking for a quick, straightforward software reset for minor touch lag. |
| Touch Screen Test | Multi-touch testing, pressure sensitivity display, drawing and gesture tests. | 4.4 Stars | Diagnosing specific dead spots or multi-touch recognition issues before trying a reset. |
| Display Tester | Wide range of diagnostic tools, including dead pixel tests, color tests, and touch screen analysis. | 4.3 Stars | Advanced users who want to thoroughly test every aspect of their display, not just calibrate. |
| Screen Test Pro | Tests for multi-touch, pressure, and provides detailed touch point coordinates. | 4.0 Stars | Identifying intermittent "ghost touch" problems or tracking precise touch inaccuracies. |
While no app is a miracle cure, the ones in this table are well-regarded and can help you either diagnose or potentially resolve software-based touch issues. After using one, a device restart is always a good idea to make sure any changes stick.
A Typical Walkthrough with a Calibration App
Let's walk through what the experience is actually like. Most of these apps follow a pretty similar script to map out your screen's responsiveness.
You'll usually see an interface like this on the app's store page.
They keep it simple—just a big "Calibrate" button. No need to be a tech wizard.
Once you hit start, the process typically unfolds like this:
- Single Tap: The app shows targets one by one across your screen. You tap the center of each. This is a basic test for dead zones or areas where your touch is registering off-center.
- Double Tap: Same idea, but now you have to double-tap each target. This checks the screen's response time and its ability to handle quick inputs without lagging.
- Swipes and Gestures: Next, you'll be asked to swipe across the screen—long drags, short flicks, maybe even a pinch-to-zoom. This collects data on how well the digitizer tracks continuous motion.
- The "Fix": After the tests, the app crunches the data, shows you a summary (like your screen’s response time), and then applies the fix. This is the part where it requests a system reset of your phone's touch profile.
You’ll almost always be prompted to restart your phone afterward. Don't skip this step; it’s what actually loads the freshly reset calibration data.
Key Takeaway: Third-party calibration apps are software tools that just reset your phone's touch data. They can't fix a physically broken screen. If you've got dead spots from a drop or pressure damage on a foldable, an app won't help.
The Placebo Effect and Real-World Limits
It's really important to keep your expectations in check. These apps can sometimes fix software glitches that cause lag or minor inaccuracies, but they aren't a magic wand for hardware failure. If a part of your screen is physically dead, no app can revive it.
Honestly, a lot of the "improvement" people feel might just be the placebo effect. Going through a detailed process and restarting your phone makes you feel like something was fixed. In reality, just restarting your phone often clears the exact system bug that was causing the trouble in the first place.
My advice? Use these apps as your last software troubleshooting step. If your screen still acts up after using a reputable app and restarting, you can be pretty sure the problem is physical, not digital.
Advanced Software Fixes for Touch Issues

When the quick fixes and calibration apps don't cut it, it’s time to dig deeper into your phone's software. Stubborn problems like ghost touches or severe lag often point to a conflict buried in the operating system.
These next steps are more involved, but they’re your best bet for rooting out software-based glitches before you start thinking about a hardware repair.
Is a Third-Party App to Blame? Enter Safe Mode
The first thing to figure out is if a rogue app is causing the trouble. A badly coded app, especially one with overlay permissions, can absolutely wreak havoc on your touchscreen’s responsiveness. It can easily mimic a hardware failure.
Safe Mode is Android's built-in diagnostic tool. It temporarily disables all your installed third-party apps, loading only the essential system software. It's the perfect way to isolate an app-related problem.
To get into Safe Mode (this can vary slightly between manufacturers):
- Press and hold the Power button until the power menu shows up.
- Tap and hold the "Power off" or "Restart" icon on your screen.
- You should see a "Reboot to safe mode" prompt. Tap OK to confirm.
Once your phone restarts, you'll see "Safe mode" written in a corner. Now, just use your phone. If the touchscreen problems are gone, you have your culprit: a third-party app. Simply restart your phone to exit Safe Mode, then start uninstalling your most recently installed apps one by one until the issue disappears.
Clearing the System Cache Partition
If the problem sticks around even in Safe Mode, the next move is clearing the system cache partition. This isn't the same as clearing an app's cache. This process wipes temporary system files that Android uses to launch everything quickly.
Sometimes, these files get corrupted, especially after a system update, leading to all sorts of performance headaches, including touchscreen lag.
Wiping the cache partition does not erase your personal data, so it's a safe but powerful troubleshooting technique. It does require booting into your phone's Recovery Mode, which is a bit more technical.
Important Takeaway: Think of clearing the system cache like decluttering your phone's short-term memory. It forces the system to rebuild fresh, clean temporary files, which can often resolve underlying glitches that affect core functions like touch input.
The exact steps are highly specific to your phone model. A quick search for "[Your Phone Model] clear cache partition" will give you the button combination you need (usually involving the Power and Volume Down buttons) to get into Recovery Mode.
The Last Resort Factory Reset
When all else fails, the factory reset is your final software fix. This is the nuclear option. It completely wipes your device, returning it to the exact state it was in when you first opened the box.
All your apps, photos, settings, and data will be gone, so this isn't something to take lightly. You must back up your data first. Use Google One, your manufacturer's cloud service like Samsung Cloud, or just plug it into a computer to save everything important.
A factory reset is effective because it eliminates any possible software problem. But here's the key: if the touchscreen issues return after the reset and before you reinstall any apps, it’s a near-certain sign that you’re dealing with a hardware failure.
If you've also been struggling with your phone's orientation flipping, check out our guide on what to do when auto-rotate is not working, as sensor issues can sometimes be related.
It helps to know why this works. Android’s touch calibration framework has been fine-tuned since Android 4.0's release in 2011 to transform raw sensor data into clean, normalized inputs. It’s designed to correct for common driver issues that used to cause major errors. You can learn more about how Android handles touch devices in the AOSP documentation.
Keeping Your Touchscreen Healthy Long Term
We’ve covered all the software tricks and calibration apps, but the best strategy for a healthy touchscreen has nothing to do with settings menus. It’s all about prevention.
Taking a proactive approach is the single most effective way to keep your screen responsive and avoid the annoying glitches that made you search for an android touchscreen calibration guide in the first place. This isn't about secret codes; it’s about smart daily habits and wrapping your phone in the right armor.
The Critical Role of Cases and Screen Protectors
Think of your phone’s case and screen protector as more than just accessories—they're the first and most important line of defense. A quality case does way more than just protect against a drop. It adds crucial structural rigidity, preventing the subtle bending that can slowly kill the delicate digitizer that senses your touch.
This is a huge deal for today's massive, ultra-thin phones. A cheap, flimsy case might look good, but it won't stop the micro-flexing that happens every time you slide it into your back pocket and sit down. That repeated stress is a silent killer for touchscreens.
A good screen protector is just as important. It’s not just for preventing scratches; it’s a shock absorber. It helps spread the force from an impact, drastically reducing the risk of a shattered screen and a dead digitizer.
Your phone case is the frame holding everything together. Without a sturdy frame, even minor daily stresses can lead to alignment issues between the screen and the digitizer, causing phantom touches or dead zones that no software fix can resolve.
Special Care for Foldable Devices
If you own a foldable phone like a Samsung Galaxy Z Fold or Google Pixel Fold, you need to be even more careful. That flexible display and complex hinge are engineering marvels, but they also create unique weak spots.
- Dust and Debris Ingress: Even tiny particles of sand or dust getting into the hinge can cause a grinding effect. This puts uneven pressure on the inner screen, leading to dead pixels or unresponsive spots right along the crease.
- Hinge Protection is Non-Negotiable: A case with solid hinge protection is an absolute must. It shields the most complex part of your device from both impacts and debris.
- Avoid Uneven Pressure: Never stack heavy objects on your folded phone or store it where constant pressure is applied to the hinge.
For anyone with one of these incredible devices, investing in one of the best rugged phone cases designed for foldables isn't just a smart move—it’s a necessity for making sure your phone lasts.
Practical Tips for Everyday Screen Health
Beyond physical protection, a few simple habits can make a huge difference in keeping your touchscreen feeling brand new for years. These are easy to adopt and incredibly effective.
Smart Cleaning Habits
Your screen is a magnet for oils, dust, and grime, all of which can mess with touch sensitivity. Stay away from harsh chemicals like window cleaner or abrasive paper towels.
Instead, always use a soft, lint-free microfiber cloth. If you have stubborn smudges, lightly dampen the cloth with a bit of distilled water or a dedicated screen cleaning solution.
Avoid Extreme Temperatures
Never leave your phone baking on a car dashboard in the summer or sitting out in the freezing cold. Extreme heat can permanently damage the battery and internal screen components. Intense cold can make the display brittle and temporarily unresponsive.
Recognize Early Warning Signs
Pay attention to your phone. If you start noticing a flicker, a small patch of discoloration, or an intermittent dead spot, don't just ignore it. These are often the first signs that the hardware is starting to fail. Catching these problems early gives you a much better chance to back up your data and get it repaired before a small issue becomes a total screen failure.
Common Questions About Screen Calibration
After you've run through the troubleshooting gauntlet, a few key questions always seem to pop up. Let's tackle the most common ones and give you some straight answers about android touchscreen calibration in the real world.
Does Modern Android Really Need Manual Calibration?
Honestly, for most modern Android phones, manual calibration is a relic of the past. The operating systems are now packed with sophisticated algorithms that handle this for you, constantly self-correcting for tiny changes and wear over time.
Think of those calibration apps less as a true "recalibration" tool and more of a "reset" button for your touch sensor's software profile. They can’t rewrite your hardware's baseline settings, but they can clear out corrupted data that might be causing glitches. So while it might solve a software-related hiccup, it isn’t calibration in the old-school sense.
Can a Case or Screen Protector Affect Touch Accuracy?
Absolutely. This is one of the most common—and most overlooked—causes of touchscreen drama. A cheap, thick, or badly installed screen protector literally creates a physical barrier, making it harder for the digitizer to accurately register your touch.
Likewise, a case that’s just a little too tight can put uneven pressure on the screen's edges, leading to phantom touches or dead zones. It’s a perfect example of why investing in a quality, precision-engineered case and screen protector isn’t just about drops; it’s about maintaining your phone's day-to-day responsiveness. This is especially true for foldable phones, where the display and hinge are incredibly sensitive to any external pressure.
An ill-fitting case or a budget screen protector can make a perfectly healthy screen feel broken. Before assuming a hardware or software fault, removing both is a critical diagnostic step that solves the problem for a surprising number of users.
When Should I See a Professional for Repair?
If you’ve tried all the software tricks and your screen is still acting up, it’s almost certainly a hardware problem. There's a clear line where DIY troubleshooting stops being productive and professional help becomes a necessity.
It’s time to call in a pro if:
- The issue sticks around even after a factory reset (before you reinstall any apps).
- You can see physical cracks on the screen, no matter how small.
- There's screen discoloration, flickering, or bright and dark spots that won’t go away.
- A specific part of the screen is completely dead to touch—no software trick can revive a physically broken circuit.
These symptoms are red flags pointing straight to a failing digitizer or a damaged display assembly. At this stage, no amount of software tweaking or app-based android touchscreen calibration will fix the underlying damage. Save yourself the headache and contact your phone's manufacturer or a certified repair shop for a proper diagnosis.
Of course, protecting your device from day one is the best strategy. At FoldifyCase, we specialize in premium cases and accessories engineered to safeguard the unique form factor of foldable phones. We offer everything from innovative hinge protection to military-grade drop defense. Explore our collections for your device at https://www.foldifycase.com.
Shop FoldifyCase foldable phone cases
Precision cases for Galaxy Z Fold & Z Flip — full MagSafe, S-Pen ready, zero bulk.